
Overview
Workflows in Casebook can do much more than assign a single task to a single person. By combining steps, task types, assignments, and form logic, you can build workflows that guide staff, and sometimes participants, through processes that involve multiple people, multiple stages, and a specific order of operations.
This article collects practical scenarios showing how organizations can use workflows to manage these more complex processes. Each scenario describes a real-world situation, explains which workflow features make it possible, and walks through how to set up the workflow so you can recreate it in your own organization.
Use these scenarios as starting points. You can adapt the examples to your own programs, forms, and staff roles, or combine techniques from multiple scenarios to fit your process.
Benefits
- Keep multi-person processes in one place. Work that would otherwise be passed around by email, paper, or shared drives stays inside Casebook, attached to the right record.
- Control the order of work. Placing tasks in separate workflow steps ensures each person receives their task only when it’s their turn, so work happens in the right sequence.
- Make responsibilities clear. Each task is assigned to a specific person or role, so everyone knows what they’re responsible for and when.
- Keep processes moving. Assignments, deadlines, and notifications alert staff when work is ready for them, reducing delays and the need for manual follow-up.
- Standardize how work gets done. A configured workflow ensures the same process is followed every time, regardless of who is involved.
- Support compliance and documentation. Reviews, approvals, and signatures are collected through a structured, trackable process, creating a clear record of who did what.
- Reuse proven setups. Once you understand how a scenario is built, you can apply the same approach to other forms and processes across your organization.
Before You Begin
Before setting up or editing a workflow, take the time to:
- Read the introductory article on workflows & tasks to make sure you grasp essential concepts.
- Read the article on Using & Managing Tasks to make sure you understand other pertinent details about tasks.
- Review where you can find workflows in Admin. Workflows are created, defined, and turned on in Admin. Once there, find the Workflows section on the left-hand navigation menu under the module on which you wish the workflow to be available: Intake, Providers (Track), and Engage then select Workflows.
- Understand how notifications work, since workflows and tasks rely on notifications to keep staff informed about new assignments, reviews, and approaching deadlines. Notification behavior for tasks and workflows is configured by an administrator in Admin, under a module's Notifications settings.
Example Walkthrough - Completing a Program Enrollment Agreement Using “Continue Form” Tasks
Consider a human services organization that requires participants to complete an enrollment agreement before beginning a program.
This process often involves multiple people. A program coordinator prepares the agreement, the participant reviews the terms and provides their signature, and a case manager verifies that all required information has been collected.
Using a Require Form task + Continue Form tasks, the organization can coordinate the entire process through one workflow, allowing each person to contribute to the same form without manually exchanging documents or creating duplicate submissions.
For the steps detailed below, let’s pretend we have a very simple workflow that has three steps with one task in each step- like this:
|
Workflow Step |
Task Type |
Assigned To |
|
1. Prepare the Agreement |
Require Form |
Coordinator |
|
2. Participant Completion |
Continue Form |
Participant (e.g., a case person) |
|
3. Case Manager Review |
Continue Form |
Case Manager |
Step 1: Program Coordinator Prepares the Agreement
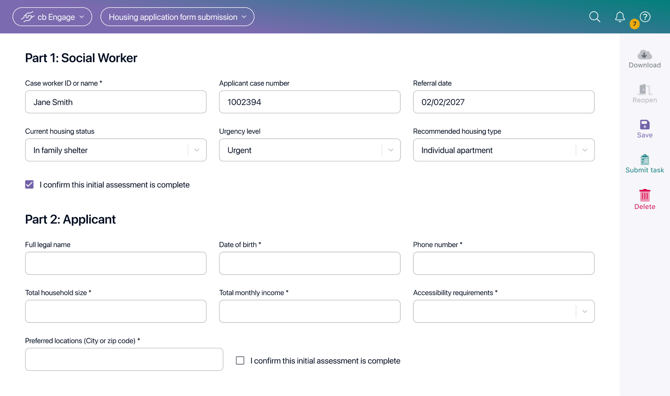
The program coordinator receives a Require Form task, which is in the first step of this example workflow.
They open the enrollment agreement and enter the information already available, such as program details, participation requirements, and enrollment information.
Once their portion is complete, the coordinator submits the task. This does not finalize or lock the form, allowing the next participant to continue working on the same submission.
Step 2: Participant Reviews and Signs the Agreement
The workflow progresses to a Continue Form task assigned to the participant, which is part of the second step of this example workflow.
The participant opens the existing agreement, reviews the information provided by the program coordinator, and completes any remaining fields, including their signature acknowledging the program requirements.
Once finished, the participant submits their task. Because another Continue Form task follows, the form remains available for the next person to review and complete.
Step 3: Case Manager Reviews the Agreement
The workflow progresses to another Continue Form task assigned to the case manager, which is part of the third step of this same example workflow.
The manager opens the same agreement, verifies that all required information and signatures have been collected, and completes any necessary review or acknowledgment fields.
As the final Continue Form task, completing this task submits and locks the form, preventing further edits.
What if We want Some of the Fields to Become Uneditable after Step 1 or Step 2?
When multiple participants contribute to the same form, you may want to prevent previously completed information from being changed. You can configure workflows and Form field logic to work together to make certain Form fields uneditable as different parts of the Form are completed.
Using conditional logic in the Casebook form builder, administrators can configure fields to become read-only based on specific responses or when a signature is applied. For example, when the coordinator completes the initial section, answering the final question/field could make all prior responses uneditable (while the participant’s section remains editable).
Another example would be to configure each field to logic once the participant provides a signature in the form.
For instructions, see Advanced Form Configuration: Conditional Field and Section Locking.
Important: Save & Continue does not automatically lock completed fields. Field locking must be configured within the form.
To Sum Up
Instead of emailing PDF documents between staff and participants or manually tracking who needs to complete each portion, the organization can manage the entire enrollment agreement within Casebook.
Each participant contributes to one form submission, while workflow assignments, deadlines, and notifications help keep the process organized and moving forward.
This approach helps organizations:
- Reduce duplicate data entry by allowing participants to build on previously entered information.
- Maintain a single submission containing all information and signatures collected throughout the process.
- Standardize document completion by establishing a consistent process for preparing, reviewing, and signing agreements.
- Improve accountability by assigning responsibilities to specific participants at each stage.
- Reduce administrative effort by eliminating the need to manually exchange documents or track completion outside Casebook.
- Support compliance and documentation requirements by coordinating reviews, signatures, and approvals through a structured process.
The same approach can be applied to intake assessments, consent forms, eligibility applications, internal reviews, and other documents requiring information or signatures from multiple contributors.
💡 Place each Required Form or Continue Form task in a separate workflow step so recipients receive their tasks in the correct order, rather than all at once.