.png?width=1286&height=255&name=logo-raspberry%20(1).png)
Think of attachments as your digital file cabinet. You can upload documents like PDFs, images, and MP4 audio files to any record, making it easy to keep relevant files right where you need them, such as a copy of a driver's license, a training certificate, or a completed form.
Attachments appear in Real Time
Attachments added through workflow tasks and ad hoc tasks appear on the record immediately after they are uploaded. If a task or workflow that originated an attachment is deleted, that attachment is automatically removed from the record as well, keeping your files clean and accurate.
How to Add an Attachment

- Select the plus icon towards the right-hand side of the Attachments section or the Add Attachment button. This will open your computer's file explorer.
- Select the file you want to upload. You can choose one file or multiple files to upload into Casebook.
- Select Open.
Note: Please note that attachments will only live on the record you uploaded them to. Its best practice to upload the attachment to the record where you will need to access it the most. For example, we suggest uploading an ID to a Person Profile instead of a Case because this type of attachment is more closely related to the person.
Viewing Attachment Details
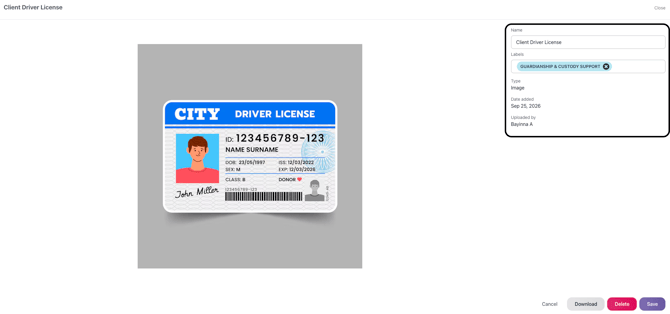
Select an attachment to open its details. Attachments use a standardized full-screen view, providing a consistent experience across supported file types.
From the attachment details, you can view information about the file and, when needed, edit its Name or apply Labels to help organize and identify the attachment.
Rename an Attachment
Attachments have an editable Name, allowing you to give files clear, descriptive names without having to re-upload them.
To rename an attachment:
- Open the attachment from the Attachments section.
- Enter edit mode.
- Update the attachment Name.
- Save your changes.
Using descriptive attachment names can make it easier to identify files, particularly when multiple attachments are associated with the same record.
Add Labels to an Attachment
You can apply Labels to attachments to help categorize and organize related files.
To add or update labels:
- Open the attachment from the Attachments section.
- Enter edit mode.
- Select or apply the appropriate Label(s).
- Save your changes.
Attachment labels are scoped to the resources where they apply, helping ensure that available labels remain relevant to the type of record or resource you are working with.
Attachment List
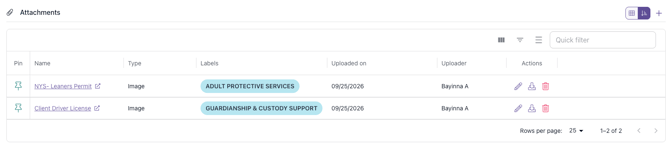
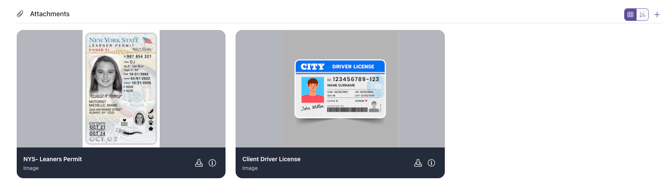
The Attachments section uses a List and Grid View to provide a more structured way to view and work with attachments. This makes attachment information easier to review as the number of files associated with a record grows.
List
Grid
Maximum File Size: As of the latest update, the maximum file size for attachments that can be uploaded in Casebook is 100 MB.
Recommendations:
-
File Size Consideration:
- Keep in mind that attachments exceeding the 100 MB limit will not be accepted by the system.
-
Optimizing Attachments:
- To ensure smooth uploading and efficient use of storage, consider optimizing files before attaching them. Compression or resizing can be useful for large documents.
-
- Use Standard File Formats: PDF (Portable Document Format) is the preferred file format for uploaded attachments due to its compatibility with most PDF viewers and its ability to maintain formatting across different devices.
- Maintain Consistent Contrast: Ensure a clear contrast between the text and the background of scanned documents. This enhances readability and reduces the risk of text blending into the background.
How to Check File Size: To check the size of a file before uploading, follow these steps:
-
On Windows:
- Right-click on the file, select "Properties," and view the "Size" information.
-
On Mac:
- Right-click (or Control-click) on the file, select "Get Info," and check the "Size" section.
-
On Mobile Devices:
- Use the file management or gallery app to view file details.
FYI:
If you’re using a Mac, document uploads may fail if the file name contains a “/” (forward slash)—for example, Report_01/10/2025.pdf. Rename the file using dashes or underscores instead (for example, Report_01-10-2025.pdf) and re-upload. This issue only affects Mac users.
Frequently Asked Questions:
Q: What happens if I try to upload a file exceeding the 100 MB limit?
A: The system will reject the file, displaying an error message. Ensure that your attachments are within the specified limit.
Q: Can the maximum file size be increased?
A: As of now, the maximum file size is set at 100 MB. For any changes or inquiries regarding this limit, please contact Casebook support.
Q: I uploaded an attachment through a workflow task. Why can I see it on the record already?
A: Attachments added through workflow tasks and ad hoc tasks appear on the record immediately after upload. You no longer need to wait for the workflow to be completed or reviewed.
Q: What happens to an attachment if the task it was uploaded through is deleted?
A: If the originating task or workflow is deleted, the associated attachment is automatically removed from the record to keep your files accurate and free of orphaned documents.