.png?width=1286&height=255&name=logo-raspberry%20(1).png)
Overview
The Client Portal provides a secure online space where invited clients can view and complete tasks assigned with them in Casebook. Instead of relying on email, phone calls, or paper forms, staff can assign work directly through Casebook, allowing clients to complete forms, upload documents, and communicate about their assigned tasks at their convenience. Staff can also assign tasks requesting that clients review or update their personal information, helping organizations maintain accurate records without manually collecting and entering every change.
Clients only see the information and tasks assigned to them, while staff can continue managing work from within Casebook.
Benefits
Using Client Portal helps your organization:
- Reduce manual follow-up with clients.
- Collect forms and supporting documents securely.
- Give clients a single place to complete assigned work.
- Track task completion in real time.
- Support clients who are involved in multiple cases or intake records through one unified task list.
Before You Begin
Before inviting a client to the Client Portal:
- The person must already exist in Casebook.
- A staff member must invite them to the Client Portal.
- The client must accept the invitation before they can access assigned tasks.
- Read the articles in an overview of Workflow & Tasks - Introduction to learn more about assigning tasks for clients to complete
Note: To use the Client Portal, your organization's subscription must include the Client Portal feature. Once enabled, only invited external users can access it. Staff members continue using Casebook to manage cases, intake, and tasks.
Invite a Person to the Client Portal
You can invite a client from several places in Casebook, including:
- A Case
- An Intake
- During Task Assignment
To Invite a Client Person
- Navigate to the People section from a Case or Intake Report.
- If the person isn’t listed in the People section, click the plus sign inline with the section header, “People”
- Start searching for their name and if the person doesn’t exist, follow the create new person flow
- If the person does exist, select them in the dropdown list
- Fill out the remainder of fields to finish adding the person to the People section
- Find the person in the People section and click the icon that, when you hover over it, shows “invite to portal.” In some cases, this option will be accessible from a button that looks like 3-dots stacked vertically.
-
- If the user has an email address attached to their profile, it will automatically appear, so that an invite can be easily sent. If the email needs to be sent to a different email address, select the drop down arrow for the add new email address option. You'll need to enter an email address before you're able to send the invite.
- Select Send Invite to send.
- The client will receive an email with instructions for accessing the Client Portal.
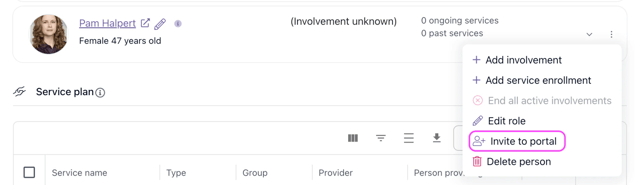
Once the invitation is sent, the person's status changes to Pending under Admin Users & teams until they accept.
To invite a client during task assignment:
- Navigate to the Task section from a Case or Intake Report.
- Complete the task information such as task name, due date, task type, and assignee.
- Once complete select Invite external user to portal.
- Select Add Task.
.png?width=311&height=383&name=image%20(27).png)
Client Person Invitation Status
The invitation status lets you know whether a client has access to the Client Portal.
|
Status |
Description |
|---|---|
|
Invite |
The client has not been invited yet. |
|
Pending |
The invitation has been sent, but hasn't been accepted. You can resend the invitation if needed. |
|
Active |
The client has accepted the invitation and can access the Client Portal. |
|
Revoked |
The client's access has been removed. They can be invited again later if needed. |
What Clients Can Do
Once signed in, clients can:
- View all assigned tasks in one place.
- Complete assigned forms.
- Upload requested documents.
- Add comments to tasks.
- View checklist items marked as complete.
- Update profile information, such as their name and phone number.
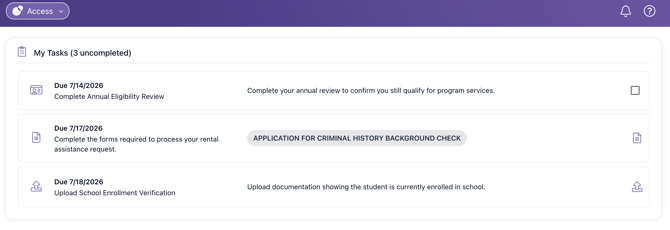
If a client is connected to multiple cases, intakes, or provider records, they'll see all of their assigned tasks in a single dashboard.
Note: Read the articles on an overview of Workflow & Tasks - Introduction to learn more about assigning tasks for provider people to complete.
Managing Client Portal Access
Resend a Client Portal Invitation
If your client has not accepted their Client Portal invitation, you can resend it at any time. To resend an invitation:
- Open the case or intake record that contains the person.
- In the People section, select the three-dot menu (⋮) next to the person's name.
- Click Resend portal invitation.
- A new invitation email will be sent to the email address on the person's profile.
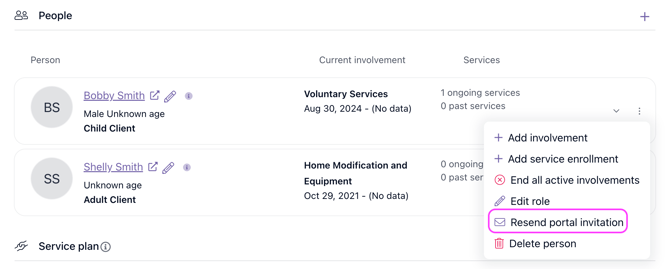
Keep in mind:
- Resending an invitation does not create a new Client Portal account. It simply sends a new invitation email to the existing email address or a new email address if needed.
- If the client has already completed account setup, they do not need another invitation. They can sign in directly using their email address and password. If they've forgotten their password, they should use Forgot password? on the sign-in page instead.
Revoking a Client Portal Invitation
If a client no longer needs access to the Client Portal, you can revoke their invitation. To revoke access:
- Locate the client in a Case or Intake.
- Select Revoke.
- Confirm your selection.
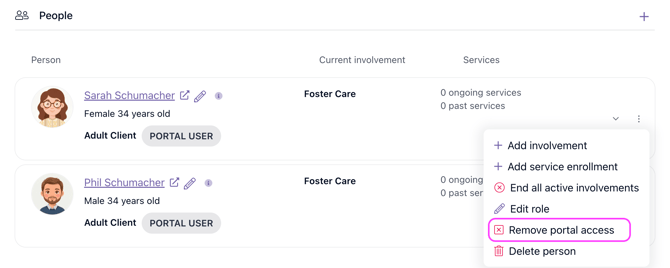
If the client needs access again in the future, simply send a new invitation.
Note: Revoking access does not delete the client's tasks. If necessary, reassign or close any outstanding tasks after access has been removed.
Manage Client Portal Users in Admin
All Portal users can only be managed from the Admin module, including Client users.
To Invite a Client Person via the Admin Module
- Navigate to Admin → Users & teams –> Portal users
- Click “+” on the screen and select “Add user”
- Fill out the new user fields and select “Client user” for the “Role” field
- Finish adding the user - the client person will then be notified of their new user account, where they can then log in.
Note: You will need to add the client person to their client record as staff for them as described earlier in this article.
Disable Client Portal Users in Admin
- Navigate to Admin → Users & teams –> Portal users
- Find the user’s name in the table
- Click the “Disable” button and follow the prompts to finish disabling the user account
Note: this is where you can also re-enable a portal user account; the disable button will become a “re-enable” button when the account is disabled. It’s recommended not to delete user accounts in case you need to reactivate them in the future.
Frequently Asked Questions
Who can use the Client Portal?
The Client Portal is available to organizations that have the Client Portal included in their Casebook subscription. Within those organizations, only invited external users can access the Client Portal. Staff members continue using Casebook to manage cases, intake records, tasks, and other work.
Can a client access multiple cases?
Yes. If a client has tasks assigned from multiple cases or intake records, they'll see all of their assigned tasks in one Client Portal dashboard.
Can clients see other people's information?
No. Clients can only access the tasks, forms, documents, and information assigned to them.
Can I resend an invitation?
Yes. If a client hasn't accepted their invitation yet, select Pending to resend it.
What happens if I revoke a client's access?
The client will no longer be able to access the Client Portal, and a notification email will not be sent. If access is needed again later, simply send a new invitation.
Can clients update their own information?
Clients can update limited profile information, such as their name and phone number.
How do clients reset a forgotten password?
If a client forgets their password, an admin user can send them a password reset email by navigating to Admin, selecting the Portal Users tab, locating the client, and clicking Recover Password. The client will then receive an email with instructions for creating a new password.
Can I delete a client's task history and account data?
Yes. If you delete a client from Casebook, any information they submitted through the Client Portal, including their task history and account data, will also be deleted.