Note: Once you have created a dynamic field, you are unable to change the label of that field without it breaking cb Reporting. It's best practice to delete the field and create a new one.
The Case Record in cb Engage and the Person Profile can be changed and customized using Dynamic fields.
Administrators can create and edit Dynamic Fields on the Case Record and Person Profile in cb Admin by selecting Dynamic Pages.
This article covers the following topics:
- Adding a New Field
- Field Types Table
- Rearrange Fields
- Deleting Fields
- Adding a Deleted Field
- Adding a New Section
- Editing a Section
- Deleting a Section
Adding a New Field
Note: Dynamic field labels cannot be more than 127 characters.
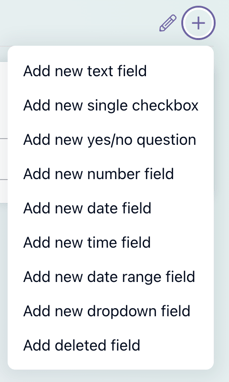
- To add a new field to a section, click on the Add field button
 (plus icon) on the right side.
 - Select the new field type you want to add. For example, if you want to add a new date field, you'd select 'Add new date field' from the options listed.
- Fill out the following:
- Field label* (Required): Depending on the field type you're adding, this can be the name of the field or a question.
- Field type* (Required - Text Field Only): This is only required for text fields. You can select a Single line of text or Multiple lines of text.
- Field width* (Required): How much space the field takes up in the section.
- Helper text: An explanation or added directions that will be displayed under a field.
- Check the box for the "This field is required" section to require the field to be filled out.
- Click Save to add the new field. Alternatively, you can click on Cancel to delete/discard the field.
- Preview changes by clicking on the Preview button
 on the right. Alternatively, you can click on Save
  on the right to save changes.
Note: You can re-arrange dynamic fields by dragging and dropping them into the order in which you wish to view them.
|
Field Type |
When to use it |
Available in reporting? |
|
Text Field |
For fields that require unique responses or longer narratives. E.g., ‘Pet name’ or ‘Criminal history’. |
Yes |
|
Single Checkbox |
For fields that have only true/false or yes/no responses. Example: ‘Intake completed?’, ‘Release form signed?’. In summary mode, an unchecked box field will read ‘no’, and a checked box will read ‘yes’. |
Yes |
|
Yes / No Question |
For fields that have only true/false or yes/no responses. Example: ‘Intake completed?’, ‘Release form signed?’. |
Yes |
|
Number |
For fields that should only accept numerical values. E.g., ‘Number of people living in home’, ‘Application ID number’. |
Yes |
|
Date |
For fields that should only accept dates. |
Yes |
|
Time |
For fields that should only accept time. |
Yes |
|
Dropdown |
For fields that have a single answer from a pre-defined picklist of options. |
Yes |
 The screenshot above shows an example of adding a text field.
 The screenshot above shows an example of adding a date field.
Rearrange Dynamic Fields and Sections
- Select the rearrange icon
 .
. - Navigate to the dynamic section or field you wish to modify.
- Click and hold the drag icon
 for the section or field you want to move.
 - Drag and drop it to the desired position on the page.
- Release to finalize the new order.
The video above shows an example of rearranging a field and section.
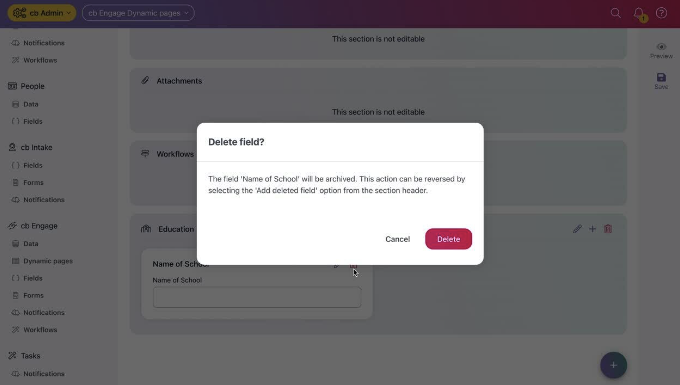
Deleting Fields
- To delete a field, click on the Delete button
 (trash can) for the field you want to delete.
 - A pop up will display to confirm you want to delete. Click Delete.
- Click Save
 on the right to confirm the changes.
Note: Deleting a field will archive it. It will not delete any previously entered data on record. Deleted fields can be added again.
Adding a Deleted Field
- To add a previously deleted field back to a section, click on the Add field button
 (plus sign) in the section you want to add the field.
 - Click 'Add deleted field'.
- You can either type in the name of the deleted field or scroll through the list of deleted fields to select it for Deleted field *.
- Once you've selected a deleted field, all the information will automatically populate. Changes can be made before saving.
- Click Save to save. Alternatively, you can select Cancel.
- Click Save
 on the right to confirm changes.
Adding a New Section
Note: Do not create a section with the same name as a Casebook section or field. For example, you should not create a new section labeled Goals because there is a field with the same label on the record.
- To add a new section to the case page, click on the Add new section button
 (plus sign) on the bottom right corner of your screen.
 - Type in the Section name (required).
- If you'd like, you can choose a section icon. Otherwise, it will default to a folder icon.
- Click save when finished. Alternatively, you can click on Cancel.
- Click Save on the right to confirm changes.

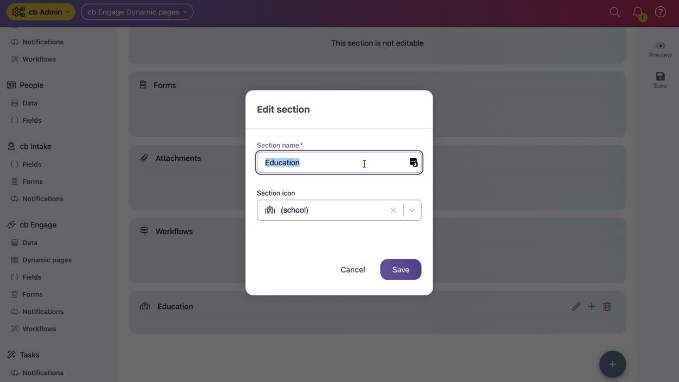
Editing a Section
- To edit the name or icon of a section, click on the Edit button
 (pencil icon) on the right side of the section you want to change.
 - Make changes then click Save. Alternatively, you can click on Cancel to discard any edits.
- Click Save on the right to confirm changes.
Note: Only the Case details section and newly added sections can be edited.
Deleting a Section
- To delete a section, click on the delete button
 (trash can) on the right side of the section you want to delete.
 - Click Delete to confirm you want to delete. Alternatively, you can click on Cancel.
- Click Save on the right to confirm changes.

Note: Deleting a section will also delete all of the fields in that section.