---
title: Integrate Casebook with Zapier
description: Zapier enables integration through an easy-to-use workflow builder interface and allows data to be passed from one application to another.
---
[Skip to content](https://gohub.casebook.net/knowledge/setting-up-integration-via-zapier#main-content)
[More support](https://gohub.casebook.net/knowledge/kb-tickets/new)
[.png?width=1286&height=255&name=logo-raspberry%20(1).png)](https://gohub.casebook.net/)
- [Knowledge Base](https://gohub.casebook.net/knowledge)
- [Video Library](https://gohub.casebook.net/video-library)
- [Still Need Help?](https://gohub.casebook.net/knowledge/kb-tickets/new)
Open main navigation
Close main navigation
- [Knowledge Base](https://gohub.casebook.net/knowledge)
- [Video Library](https://gohub.casebook.net/video-library)
- [Still Need Help?](https://gohub.casebook.net/knowledge/kb-tickets/new)
- [More support](https://gohub.casebook.net/knowledge/kb-tickets/new)
Hi. How can we help?
- There are no suggestions because the search field is empty.
1. [Knowledge Base](https://gohub.casebook.net/knowledge)
2. [Integrations](https://gohub.casebook.net/knowledge/integrations)
3. [Low-code incoming integrations with Zapier](https://gohub.casebook.net/knowledge/integrations#low-code-incoming-integrations-with-zapier)
# Integrate Casebook with Zapier
## Zapier enables integration through an easy-to-use workflow builder interface and allows data to be passed from one application to another.
Zapier enables integration through an easy-to-use workflow builder interface and allows data to be passed from one application to another.
Casebook integrates with Zapier to help you automate work between Casebook and hundreds of other applications—no coding required. Whether you're collecting information from online forms, syncing data from other systems, or streamlining repetitive tasks, Zapier makes it easy to connect your existing tools to Casebook.
This guide walks you through connecting your Casebook account to Zapier so you can begin building automated workflows. Once your connection is set up, you can use Casebook actions to create records such as People, Intake Reports, and Cases directly from your Zapier workflows.
After completing this setup, you can continue with our action-specific guides to learn how to:
- [Create a Person](https://gohub.casebook.net/knowledge/automate-person-profile-creation-with-zapier)
- [Create an Intake Report](https://gohub.casebook.net/knowledge/using-zapier-to-create-an-intake-report)
- [Create a Case](https://gohub.casebook.net/knowledge/how-to-create-a-case-in-casebook-using-zapier)
**Note:** Creating a Zapier account requires a separate subscription with Zapier. The Casebook integration is available for select plans - contact your customer success manager or product support if you run into any issues making the connection in the steps outlined in this article.
### Step 1: Create an Account on Zapier
Users can create a free Zapier account that will allow up to a certain number of “Zaps (i.e., automation jobs)” and is limited to a certain number of them per month (the Zapier website will describe their current offering in more detail). If this number is exceeded, tasks are held in a queue until the billing period resets or the account is upgraded. To sign up for a Zapier account, visit [https://zapier.com and navigate to the sign up area.](https://zapier.com/sign-up)
### Step 2: Create an External Application Record in Admin
1. Navigate to Admin and select Integrations, then select the **incoming** tab**.**
2. Select the **+ Icon** in the bottom right-hand corner to register an external application.
3. Accept the **Security Confirmation.**
4. Enter the required information, including the Application Name, Email, Application URL, and Roles. Once you are finished, select **Save**. For more information, check out [this article](https://gohub.casebook.net/knowledge/add-3rd-party/external-application-to-casebook). 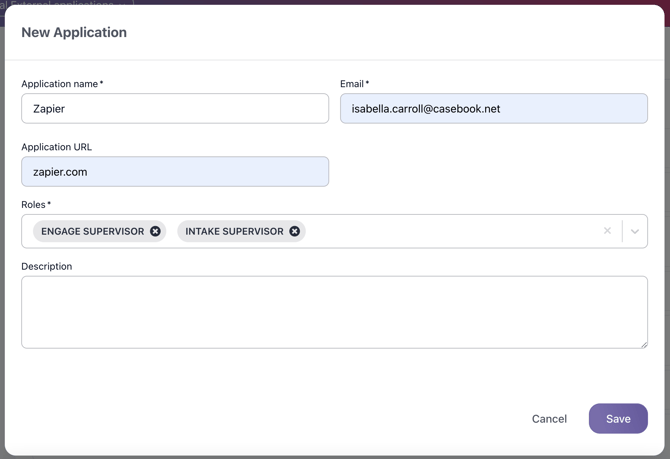
5. You will need several pieces of information from this new application. Select the **^ Icon** to expand the card. You will need the **Client ID**, the **Casebook URL**, and the **Secret Key**. The secret key can be accessed by selecting the **Key Icon**, then entering in your Casebook password. 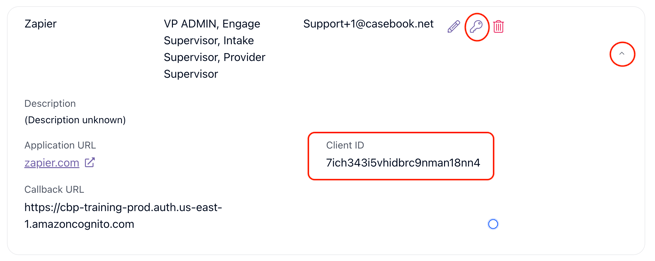
**Tip:** External Application emails must be unique and cannot match an existing Casebook user. If needed, use an email alias (e.g., `Youremail+1@casebook.net`) to create a valid unique email.
### Step 3: Connect Zapier to Casebook
1. Once your Zapier account is set up, click on **My Apps. 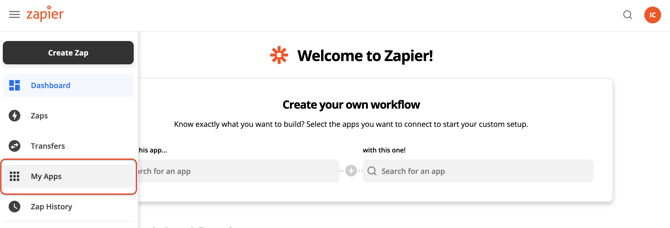**
2. Select **+ Add Connection**. Search for **Casebook** in the list.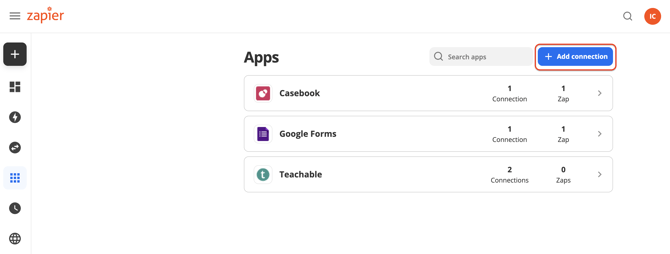
3. Enter in the **Client** **ID**, **Client** **Secret**, and **Casebook** **URL**. Then select **Yes, Continue**. 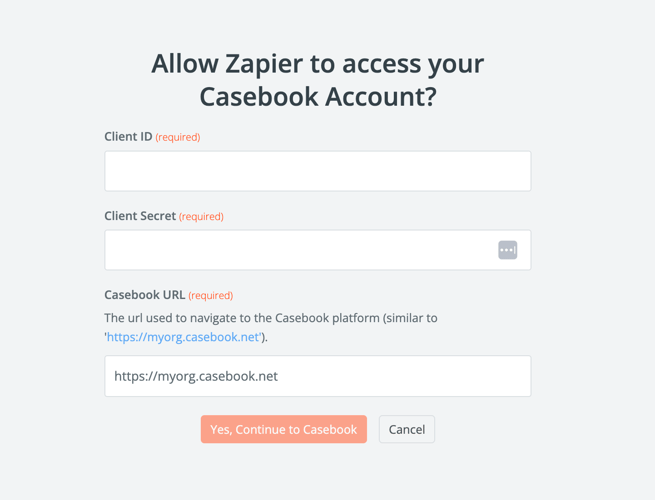
**Note:** If you don’t see the connection, try clicking on the invitation link again.
Check out how to connect Casebook with Zapier in the video below:
### Step 4: Build Your Zap
Every Zap requires a Trigger, the event that starts the process, and at least one Action, for example: Create an Intake Report. For detailed information on building a Zap, check out [Zapier's Knowledge Base](https://zapier.com/help).
Check out how to build your first Zap in the video below:
**Note:** When creating a Zap that connects to an Intake Report, the email section must be marked as required.
- [Getting Started With Casebook](https://gohub.casebook.net/knowledge/getting-started-with-casebook#main-content)
- [Casebook Overview](https://gohub.casebook.net/knowledge/getting-started-with-casebook#casebook-overview)
- [Getting Started for New Users](https://gohub.casebook.net/knowledge/getting-started-with-casebook#getting-started-for-new-users)
- [Services in Casebook](https://gohub.casebook.net/knowledge/getting-started-with-casebook#services-in-casebook)
- [Notes](https://gohub.casebook.net/knowledge/getting-started-with-casebook#notes)
- [Admin](https://gohub.casebook.net/knowledge/admin#main-content)
- [Casebook Security](https://gohub.casebook.net/knowledge/admin#casebook-security)
- [Roles and Permissions](https://gohub.casebook.net/knowledge/admin#roles-and-permissions)
- [User Management](https://gohub.casebook.net/knowledge/admin#user-management)
- [Notifications](https://gohub.casebook.net/knowledge/admin#notifications)
- [Data](https://gohub.casebook.net/knowledge/admin#data)
- [Field Configuration](https://gohub.casebook.net/knowledge/admin#field-configuration)
- [Dynamic Fields](https://gohub.casebook.net/knowledge/admin#dynamic-fields)
- [Forms](https://gohub.casebook.net/knowledge/admin#forms)
- [Implementation & Adoption](https://gohub.casebook.net/knowledge/admin#implementation-adoption)
- [People](https://gohub.casebook.net/knowledge/people)
- [Intake](https://gohub.casebook.net/knowledge/intake)
- [Engage](https://gohub.casebook.net/knowledge/engage#main-content)
- [Text Messages](https://gohub.casebook.net/knowledge/engage#text-messages)
- [Configuration](https://gohub.casebook.net/knowledge/engage#configuration)
- [Notes](https://gohub.casebook.net/knowledge/engage#notes)
- [Track](https://gohub.casebook.net/knowledge/track)
- [Access](https://gohub.casebook.net/knowledge/access)
- [Workflow & Tasks](https://gohub.casebook.net/knowledge/workflow-tasks)
- [Reporting](https://gohub.casebook.net/knowledge/reporting#main-content)
- [Overview](https://gohub.casebook.net/knowledge/reporting#overview)
- [Datasets](https://gohub.casebook.net/knowledge/reporting#datasets)
- [Dashboards](https://gohub.casebook.net/knowledge/reporting#dashboards)
- [Pre-built Reports](https://gohub.casebook.net/knowledge/reporting#pre-built-reports)
- [Custom Reports](https://gohub.casebook.net/knowledge/reporting#custom-reports)
- [Data Visualizations](https://gohub.casebook.net/knowledge/reporting#data-visualizations)
- [Filters](https://gohub.casebook.net/knowledge/reporting#filters)
- [Calculated Fields](https://gohub.casebook.net/knowledge/reporting#calculated-fields)
- [Other](https://gohub.casebook.net/knowledge/reporting#other)
- [Audit Logs](https://gohub.casebook.net/knowledge/audit-logs)
- [Integrations](https://gohub.casebook.net/knowledge/integrations#main-content)
- [Low-code incoming integrations with Zapier](https://gohub.casebook.net/knowledge/integrations#low-code-incoming-integrations-with-zapier)
- [Custom incoming integrations with Casebook API](https://gohub.casebook.net/knowledge/integrations#custom-incoming-integrations-with-casebook-api)
- [Custom outgoing integrations with Webhooks](https://gohub.casebook.net/knowledge/integrations#custom-outgoing-integrations-with-webhooks)
- [Program Area Specific](https://gohub.casebook.net/knowledge/program-area-specific#main-content)
- [VOCA Reporting](https://gohub.casebook.net/knowledge/program-area-specific#voca-reporting)
- [Customer Support](https://gohub.casebook.net/knowledge/customer-support#main-content)
- [Getting Unstuck](https://gohub.casebook.net/knowledge/customer-support#getting-unstuck)
- [Account Management](https://gohub.casebook.net/knowledge/customer-support#account-management)
- [Product Release Notes](https://gohub.casebook.net/knowledge/product-release-notes#main-content)
- [2026](https://gohub.casebook.net/knowledge/product-release-notes#2026)
- [2025](https://gohub.casebook.net/knowledge/product-release-notes#2025)
- [2024](https://gohub.casebook.net/knowledge/product-release-notes#2024)
- [2023](https://gohub.casebook.net/knowledge/product-release-notes#2023)
- [2022](https://gohub.casebook.net/knowledge/product-release-notes#2022)
- [2021](https://gohub.casebook.net/knowledge/product-release-notes#2021)
- [2020](https://gohub.casebook.net/knowledge/product-release-notes#2020)
- [Frequently Asked Questions](https://gohub.casebook.net/knowledge/frequently-asked-questions#main-content)
- [Global](https://gohub.casebook.net/knowledge/frequently-asked-questions#global)
- [Casebook Calendar](https://gohub.casebook.net/knowledge/frequently-asked-questions#casebook-calendar)
- [Casebook Services](https://gohub.casebook.net/knowledge/frequently-asked-questions#casebook-services)
- [Casebook Forms](https://gohub.casebook.net/knowledge/frequently-asked-questions#casebook-forms)
- [Casebook Notes](https://gohub.casebook.net/knowledge/frequently-asked-questions#casebook-notes)
- [cb Admin](https://gohub.casebook.net/knowledge/frequently-asked-questions#cb-admin)
- [cb Track](https://gohub.casebook.net/knowledge/frequently-asked-questions#cb-track)
- [cb Reporting](https://gohub.casebook.net/knowledge/frequently-asked-questions#cb-reporting)
- [cb Access](https://gohub.casebook.net/knowledge/frequently-asked-questions#cb-access)
- [Program Specific](https://gohub.casebook.net/knowledge/frequently-asked-questions#program-specific)
[](https://www.casebook.net/)
© 2025 Casebook. All rights reserved.
Casebook Knowledge Base [Video Library](https://gohub.casebook.net/video-library) [Still Need Help?](https://gohub.casebook.net/knowledge/kb-tickets/new)
```json
{
"@context" : "https://schema.org",
"@type" : "VideoObject",
"contentUrl" : "https://6899772.fs1.hubspotusercontent-na1.net/hubfs/6899772/Knowledge%20Base%20Videos%20from%20Vidyard/Connect%20Casebook%20to%20Zapier%2032022.mp4",
"dateModified" : "2024-09-11T19:33:36.385Z",
"duration" : "PT2M36S",
"height" : 1080,
"name" : "Connect Casebook to Zapier 32022",
"thumbnailUrl" : "https://gohub.casebook.net/hubfs/Knowledge%20Base%20Videos%20from%20Vidyard/Connect%20Casebook%20to%20Zapier%2032022.mp4/medium.jpg",
"uploadDate" : "2024-09-11T18:40:41.971Z",
"width" : 1920
}
```
```json
{
"@context" : "https://schema.org",
"@type" : "VideoObject",
"contentUrl" : "https://6899772.fs1.hubspotusercontent-na1.net/hubfs/6899772/Knowledge%20Base%20Videos%20from%20Vidyard/Create%20a%20Zap%2032022.mp4",
"dateModified" : "2024-09-11T19:33:42.029Z",
"duration" : "PT2M35S",
"height" : 1080,
"name" : "Create a Zap 32022",
"thumbnailUrl" : "https://gohub.casebook.net/hubfs/Knowledge%20Base%20Videos%20from%20Vidyard/Create%20a%20Zap%2032022.mp4/medium.jpg",
"uploadDate" : "2024-09-11T18:40:12.120Z",
"width" : 1920
}
```